
Taming The Cookie Consent Monster
- Length
- 3809 words
- Published
- Sun 1st March, 2026
Is there anything worse than when you read the first sentence of an article and pop, suddenly it’s rendered unreadable by cookie consent taking over the whole page?
Consent management banners are an unfortunate necessity in the EU and UK. Hopefully we’ll see updated legislation that will move the responsibility to browser preferences—as it always should have been[1]—but in the meantime we should at least do our bit to inflict as little pain on our visitors as possible… maybe let’s not slap them in the face on arrival.
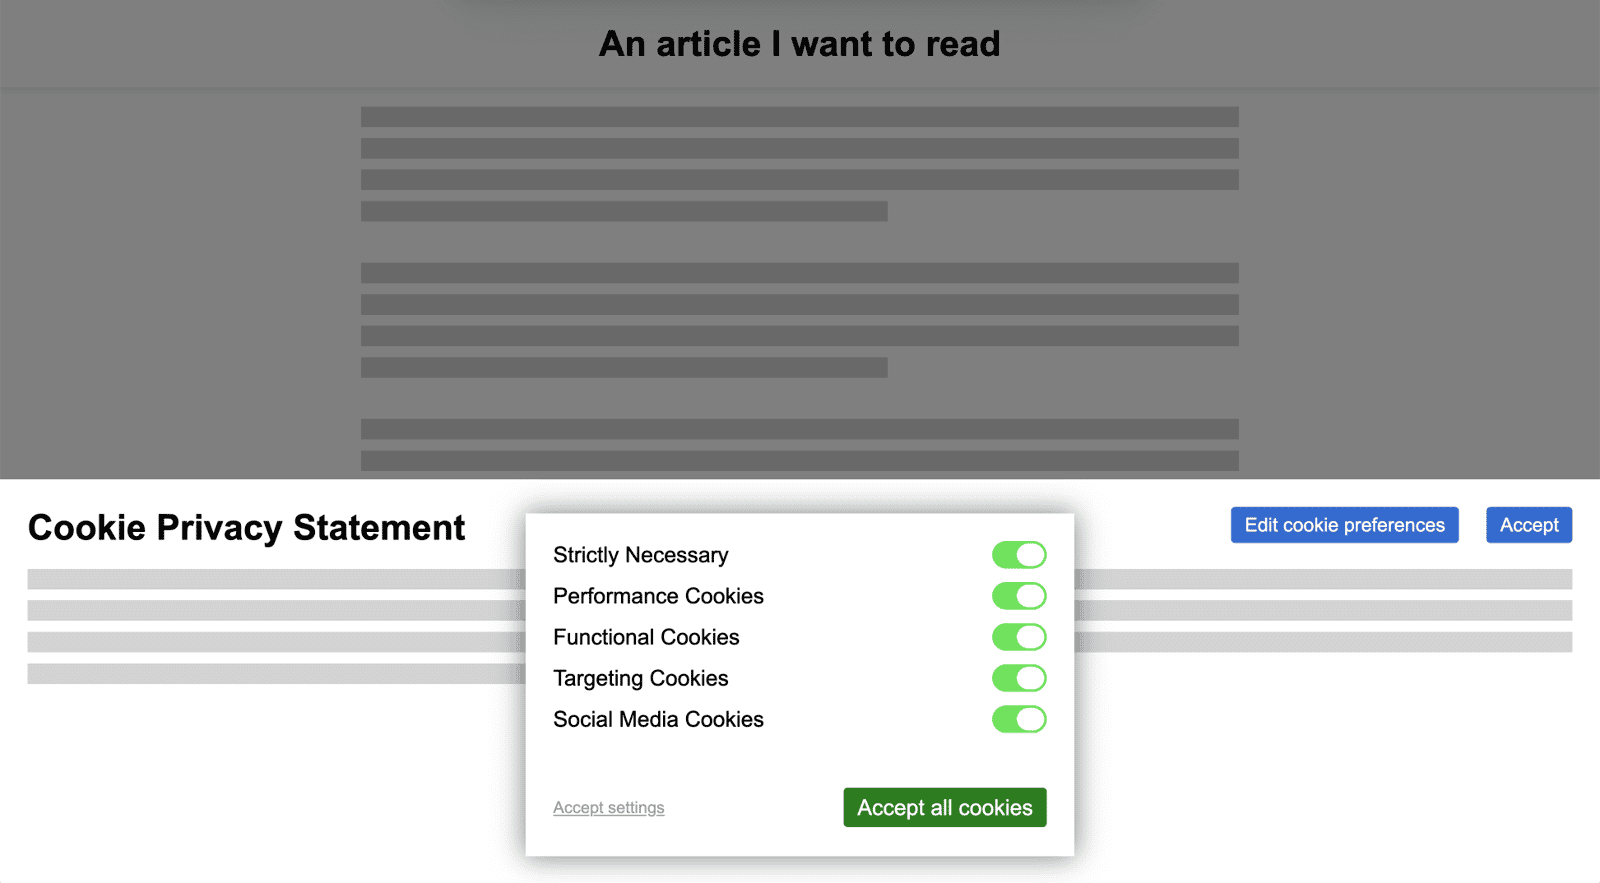
How I experience the web today, a satirical website demonstrating the intrusive nature of cookie consent banners, among other popular web annoyances.
Alas, from a web performance perspective, this is something few providers seem to be concerned about.
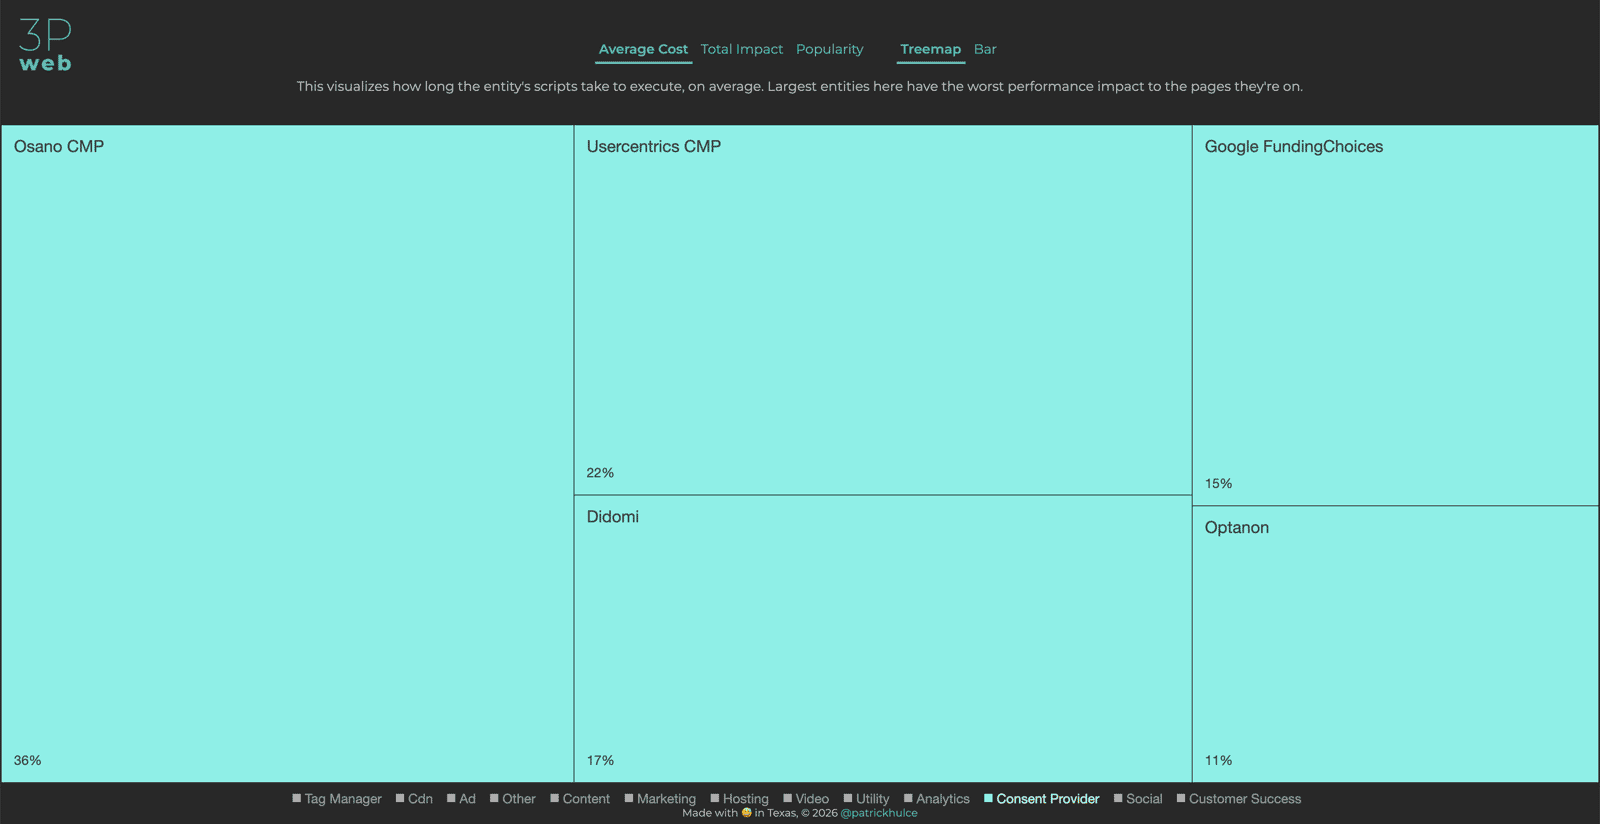
Patrick Hulce’s third party web project reports that consent management providers add between 0.2 and 1.5 seconds of script execution time on average to websites (note: this excludes the scripts they load in – it’s their isolated overhead!), with the most popular providers typically being the worst offenders.
All three Core Web Vitals can be affected by consent management implementations:
Cookie banners can often be the largest element on screen, particularly on mobile, making them a common Largest Contentful Paint (LCP) candidate, at least for the first pageview. This has already led some providers to hack around this by slicing paragraphs into individual elements simply to game metrics and keep themselves out of the firing line of RUM analytics.
When consent is granted, or on subsequent page loads, executing all the third-party tracking, tag managers and other plugins that load in can block the main thread for significant periods of time, therefore negatively impacting Interaction to Next Paint (INP). Imagine this: your visitor has kindly granted you consent to load all your tracking and in return, you block visual updates and interactions. Great work.
Cumulative Layout Shift (CLS) can also be affected, particularly when the banner is statically-positioned and pushes the rest of the page down, or when webfonts load in late causing reflow within the banner itself.
Why build your own?
A couple of years ago I was responsible for a rebuild of a British retailer on Shopify. Less performance-conscious developers have since taken over and caused regressions, but the website continues to performs pretty well:
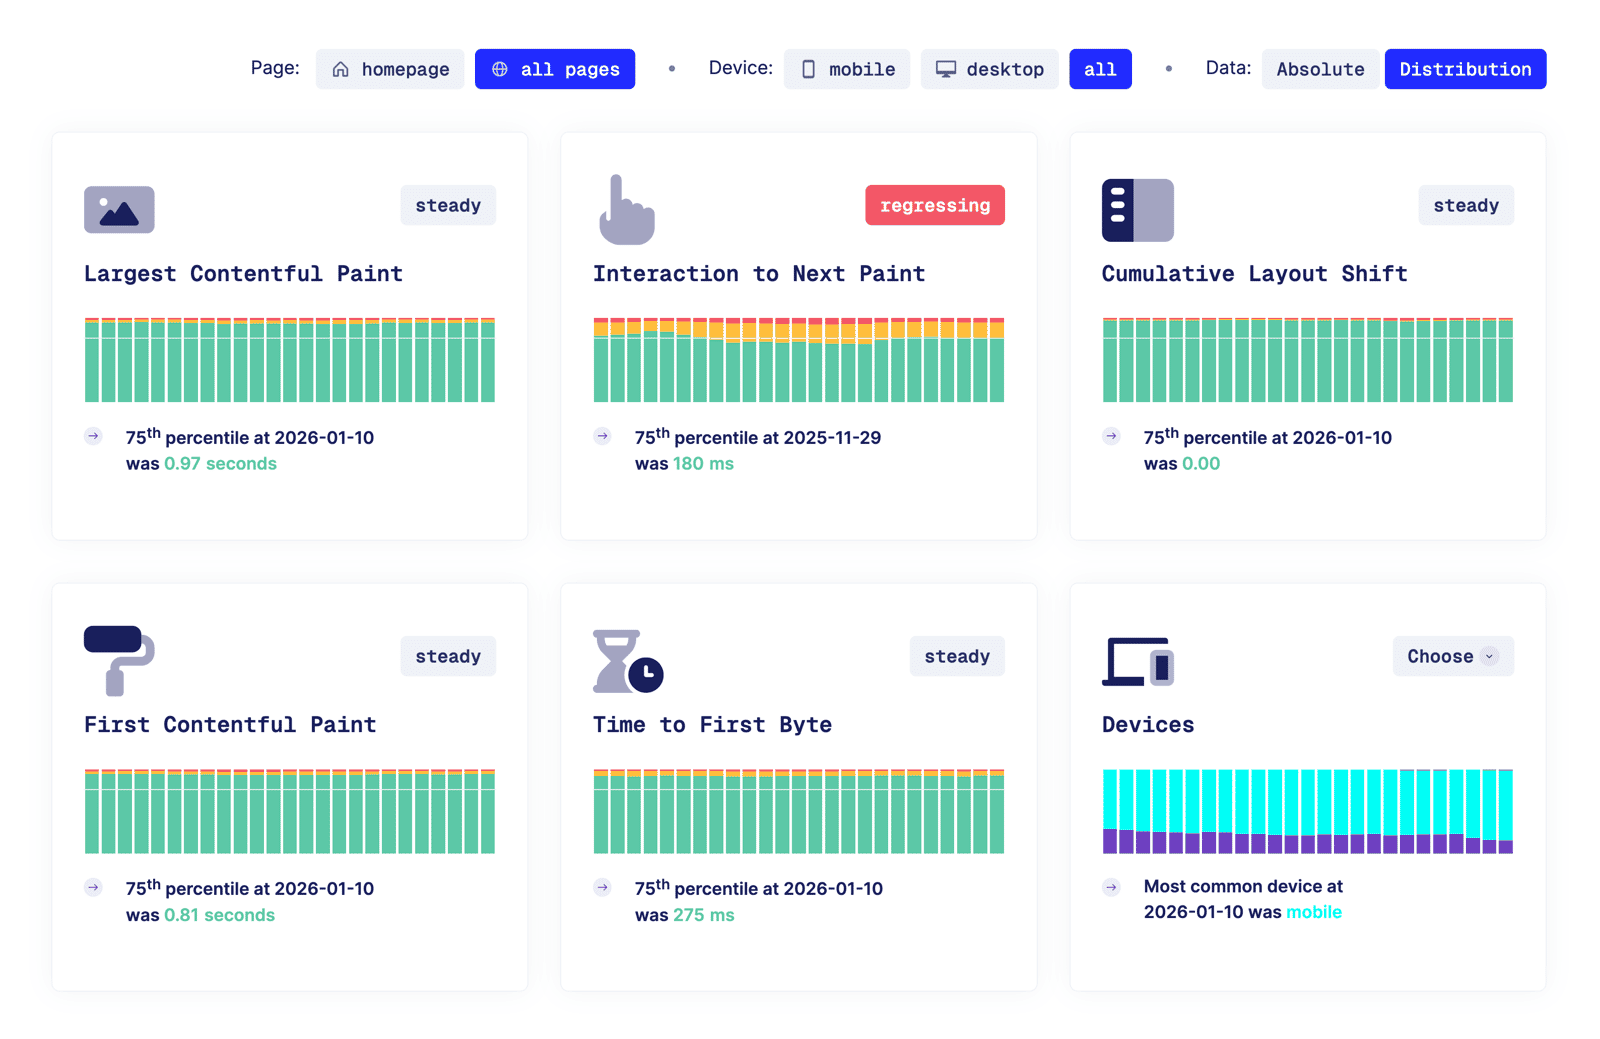
The Core Web Vitals are passing overall, but I’m sad to report that INP is now failing on mobile, having regressed from just above 100ms to 207ms, breaching the ‘Good’ threshold.
Screenshot from RUMvision’s free Core Web Vital History Checker
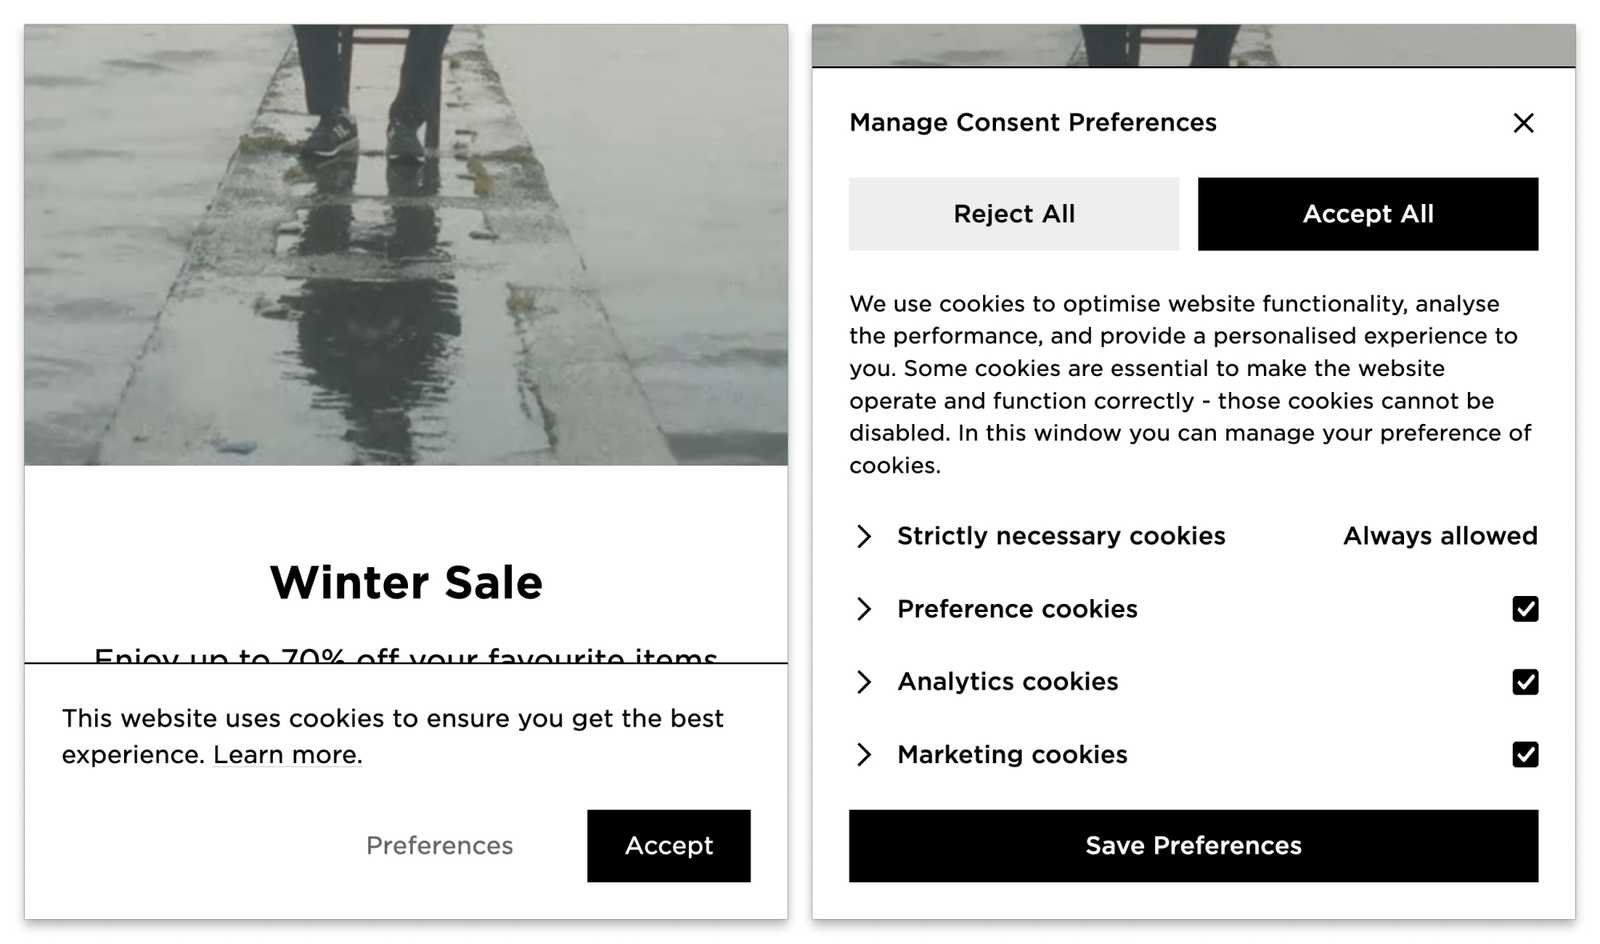
Part of this performance is thanks to the custom consent management I implemented:
Why might you want to do the same? A few reasons:
- Third-party JavaScript represents risk.
Even if you measure day one, there's nothing to say the provider won't introduce regressions in the future. Yes, you could cause regressions in your own code, but at least you have the control to fix it immediately and the context to understand why it happened in the first place. - Complete control over the user experience.
Third-parties typically design for ease of installation and broad use-cases over a completely flexible user experience. - It's really not that complicated.
I've taken the approach described in this article to an extreme, but even if you just take a few pointers you can achieve a very performant solution. My example is a whopping 58 lines of client-side JavaScript and 105 lines server-side[2].
The downside is primarily that you need to understand and keep up-to-date with the legislation.
Whether you’re using Shopify, another platform, building a completely bespoke solution or you even work at a Consent Management Provider (CMP) this advice should cover all use-cases.
Getting started
I love how the Web Platform is a lot like building with LEGO, there are a bunch of APIs we can combine to build a simple, performant solution, today we'll make use of:
<dialog>elements- Invoker Commands
- The Cookie Store API
- The Navigation API
- The Fetch API
- And the FormData API
This might seem like a lot of APIs, but combining these standards results in a very concise, robust solution. So if any are new to you, definitely read on, you might discover other ways you can utilise them in your work.
This is a big topic, so I’m going to break it down into a five sections:
- Rendering our banner[3]
- Persisting consent choices[4][5]
- Executing the tracking[6]
- Conditionally displaying the banner[7][8][9]
- Withdrawing/changing consent[10][11]
If this is all a little TL;DR: you jump to checking out the demo site and open-source GitHub repository.
1. Rendering our banner
<dialog> elements are perfect for building consent banners.
The initial banner can be a regular <dialog> because in their non-modal form, they don’t render the rest of the page inert, allowing our visitors to browse without being forced to make a decision immediately.
If you do want to force your visitors to make a decision before they can interact, you’ll unfortunately either need to use a little JavaScript to enhance the element by calling close() then showModal() on it—this can result in a flicker, but at least it should occur early into page load.
I want to preface that I have no data on this, but I’d hope more people are likely to click accept when you let them actually start browsing and interacting first.
Either way, the days are numbered for forcing people to accept by implementing dark patterns to make rejection more challenging—the EU has been cracking down on this.
Sidenote: if you'd like to see a declarative means to open a dialog as a modal, there's an open issue on the Open UI repo, so please add your thumbs up or comment with your use-case.
We can use a second <dialog> for customising your choices, this time implemented as a modal and opened via a show-modal Invoker Command on a button within the initial banner.
Putting this together, our HTML might look something like this[3:1]:
<dialog class="consent-dialog" id="consent-banner"><!-- we'll come to dynamically adding `open` later -->
  <p>We use cookies, do you want cookies too?</p>

  <button type="button" command="show-modal" commandfor="consent-options" id="customise-btn">
    Customise choices
  </button>

  <button type="submit" form="consent-options-form" name="action" value="accept-all" id="accept-all-btn">
    Accept all the cookies!
  </button>
</dialog>

<dialog class="consent-dialog" id="consent-options">
  <p>What cookies do you want?</p>
  <form method="post" action="/consent" id="consent-options-form">
    <label>
      <input type="checkbox" checked disabled>
      Required Cookies
    </label>

    <label>
      <input type="checkbox" name="consent-analytics" value="true" checked>
      Analytics Cookies
    </label>

    <label>
      <input type="checkbox" name="consent-marketing" value="true" checked>
      Marketing Cookies
    </label>

    <button type="submit" name="action" value="reject-all" id="reject-all-btn">
      Reject all
    </button>

    <button type="submit" id="save-choices-btn">
      Save choices
    </button>
  </form>
</dialog>
There are a few things to note here:
- Our 'Accept All' button uses the
formattribute to submit the form within the second dialog. This means if you want to listen on submit, there is only one form to attach a listener to. If you want to learn more about these uncommon attributes, check out my previous article on forms. - Our buttons have IDs, these effectively just act as labels to help identify them in RUM data.
You could use the switch attribute on your checkboxes to make them toggles. It's currently only supported by Safari but it degrades gracefully to regular checkboxes in other browsers and Thomas Steiner has a polyfill that even supports the accent-color CSS property.
2. Persisting our choices
I included a <form> in the HTML above because we could literally just persist our choices with a simple server-side endpoint and redirect back.
I say ‘could’ because it would be a little shitty to perform a page reload right after someone has kindly provided their consent choices–let's not forget this is already just an annoying hassle to them.
But by building this as a progressive-enhancement, we safely handle what Paul Lewis coined as ‘The Uncanny Valley’ of the websites—the gap between render and JavaScript arriving and executing to handle interactivity.
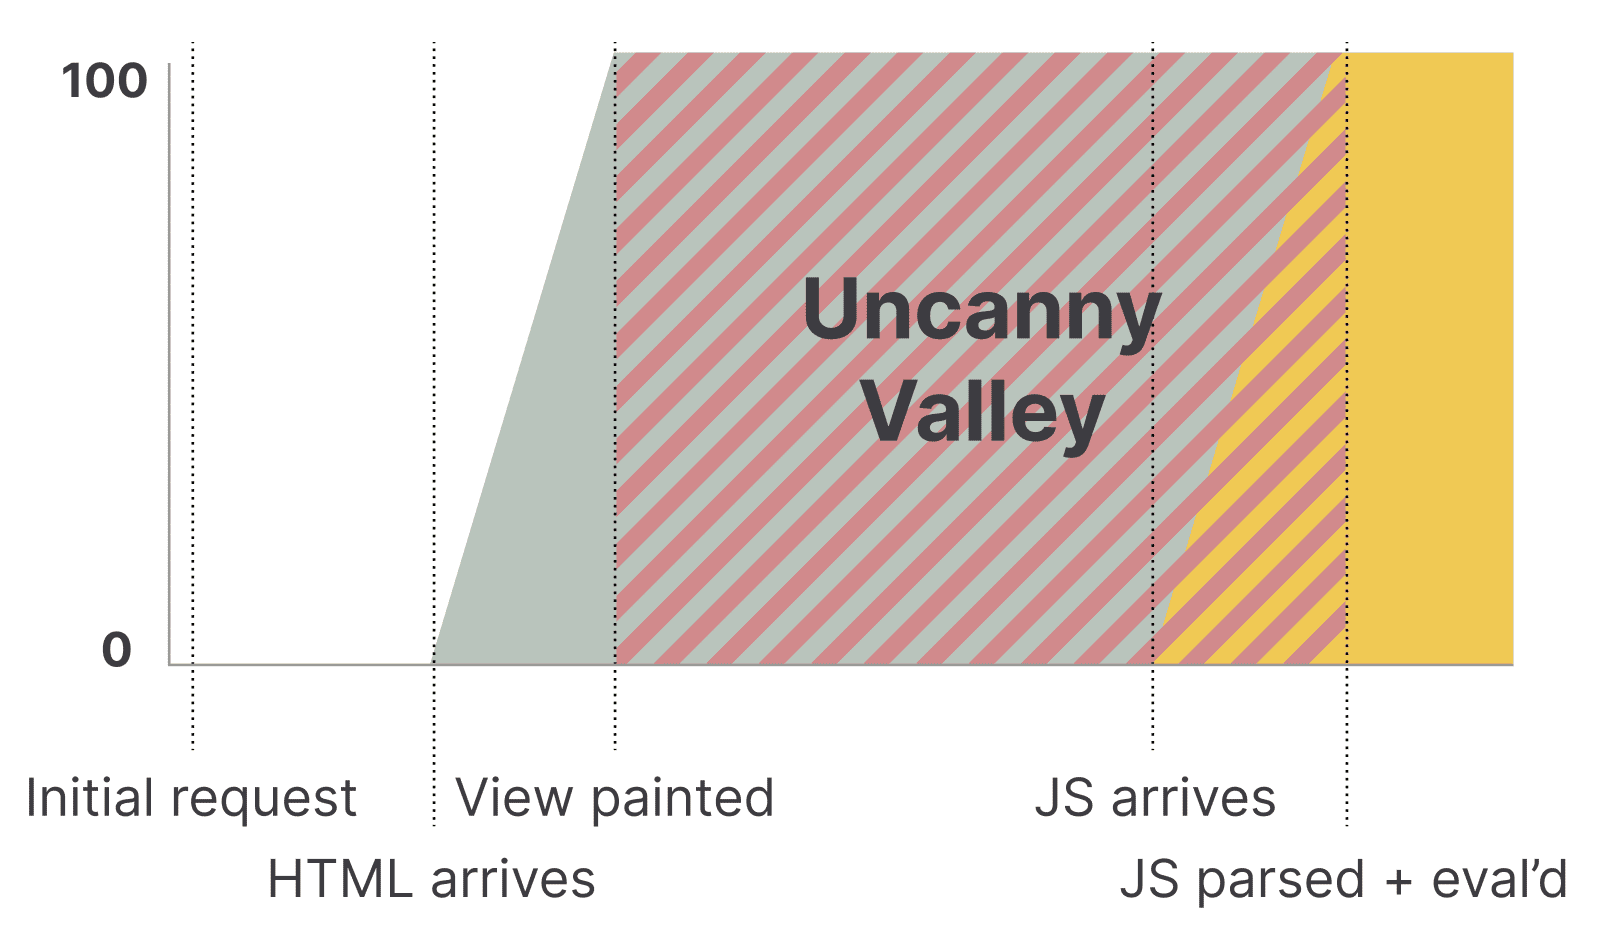
We've been able to intercept form submissions via dedicated event listeners for decades now, but with the Navigation API now available in all browsers, you might want to consider using it as we can decouple from our DOM, certainly if you're reading this mid-2026 onwards.
window.navigation.addEventListener("navigate", navigateEvent => {
  // only intercept form submissions
  if (!navigateEvent.canIntercept || !navigateEvent.formData) return

  // parse our destination URL
  const url = new URL(navigateEvent.destination.url)

  // we only care about our consent endpoint
  if (url.pathname === "/consent") {
    requestAnimationFrame(async () => {
      // close our dialogs first
      document.querySelectorAll(".consent-dialog").forEach(dialog => dialog.close())
      // then submit the form data to the server
      await fetch(url, {
        method: "POST",
        body: navigateEvent.formData,
        // prevent all use of our cache
        cache: "no-store",
        // prevent the browser from following the redirect returned for hard navigations
        redirect: "manual"
      })
    })
    // we didn't actually intercept the navigation, given we don't technically want one
    navigateEvent.preventDefault()
  }
})
You might wonder why we're still making a fetch request when we're simply storing preferences? Could we not just store the consent choices in JavaScript-defined cookies and skip the server-side persistence? Unfortunately not: Article 7 of GDPR states:
“Where processing is based on consent, the controller shall be able to demonstrate that the data subject has consented to processing of his or her personal data.”
It's a little ambiguous as to whether you could use the complainant's own browser cookies as evidence, but I'd certainly not want to rely on that in the event of a legal challenge!
Ultimately we only need to store these in our logs, no need for a database, so our server-side endpoint can be very simple[4:1]:
const consentKeys = ["consent-analytics", "consent-marketing"]
const consentExpiry = Date.now() + 30 * 24 * 60 * 60 * 1000 // 30 day expiry
const cookieOptions = { path: "/", secure: true, sameSite: "Strict", expires: consentExpiry }

export default async (request: Request, context: Context) => {
  console.log("Persisting consent choices");

  const formData = await request.formData()
  let cookies = {}

  if ("reject-all" === formData.get("action")) {
    consentKeys.forEach(key => { cookies[key] = false })
  } else if ("accept-all" === formData.get("action")) {
    consentKeys.forEach(key => { cookies[key] = true })
  } else {
    consentKeys.forEach(key => { cookies[key] = ("true" === formData.get(key)) })
  }

  // store when consent was set as a UNIX timestamp
  cookies["consent-timestamp"] = Math.floor(Date.now() / 1000)
  // store a UUID to identify this consent in case of a legal challenge
  cookies["consent-id"] = crypto.randomUUID()

  // log our consent choices for auditing purposes, you could alternatively persist to a DB
  console.log({ ip: context.ip, ...cookies })

  for (const [name, value] of Object.entries(cookies)) {
    // persist the consent choices in cookies for the CDN to read on subsequent page loads
    context.cookies.set({ name, value, ...cookieOptions })
  }

  // if we've forced the banner open (e.g. allowing changing of consent choices), then remove the flag
  context.cookies.delete("consent-force")

  // return an redirect for hard navigations
  return Response.redirect(request.headers.get("referer") || "/", 302)
}
3. Executing the tracking
The Cookie Store API introduced a really underrated capability to the web: the ability to listen on cookie changes.
This is why the above server-side response can be empty. We don't need to parse anything from the body, we can just listen for the cookie change [6:1]:
// read whether consent is necessary (assume anything but "false" is true)
const consentNecessary = "false" !== (await cookieStore.get("consent-necessary"))?.value;
// check if we have consent choices set already
const hasConsent = await cookieStore.get("consent-timestamp");

// on page load, if we have consent already (or don't need it), load tracking scripts
if (hasConsent || !consentNecessary) {
  loadTrackingScripts();
// if we don't have consent, set up a listener for when it's given
} else {
  // we use an AbortController to stop listening once consent is set
  const cookieStoreAbortController = new AbortController();
  // listen for cookie changes
  window.cookieStore.addEventListener("change", event => {
    for (const change of event.changed) {
      if (change.name.startsWith("consent-timestamp")) {
        // stop listening for cookie changes
        cookieStoreAbortController.abort();
        // load tracking scripts now consent is given
        loadTrackingScripts();
        // stop looping
        break;
      }
    }
  }, { signal: cookieStoreAbortController.signal });
}
It'll be up to you to implement loadTrackingScripts(), you might want to use a tag manager or load the scripts directly based on the values of the consent-marketing, consent-analytics cookies, etc.
If you're simply injecting script tags, they will execute in their own task, even if they are cached, but if there's a lot of execution within the tag manager itself for example, you might want to introduce some yielding via the Scheduler API.
4. Conditionally displaying the banner
Run a Lighthouse test or capture a trace in the Performance Panel and you will often see warnings about the “Network Dependency Tree”, this should make it clear: we know that long chains of requests equate to slow loading times.
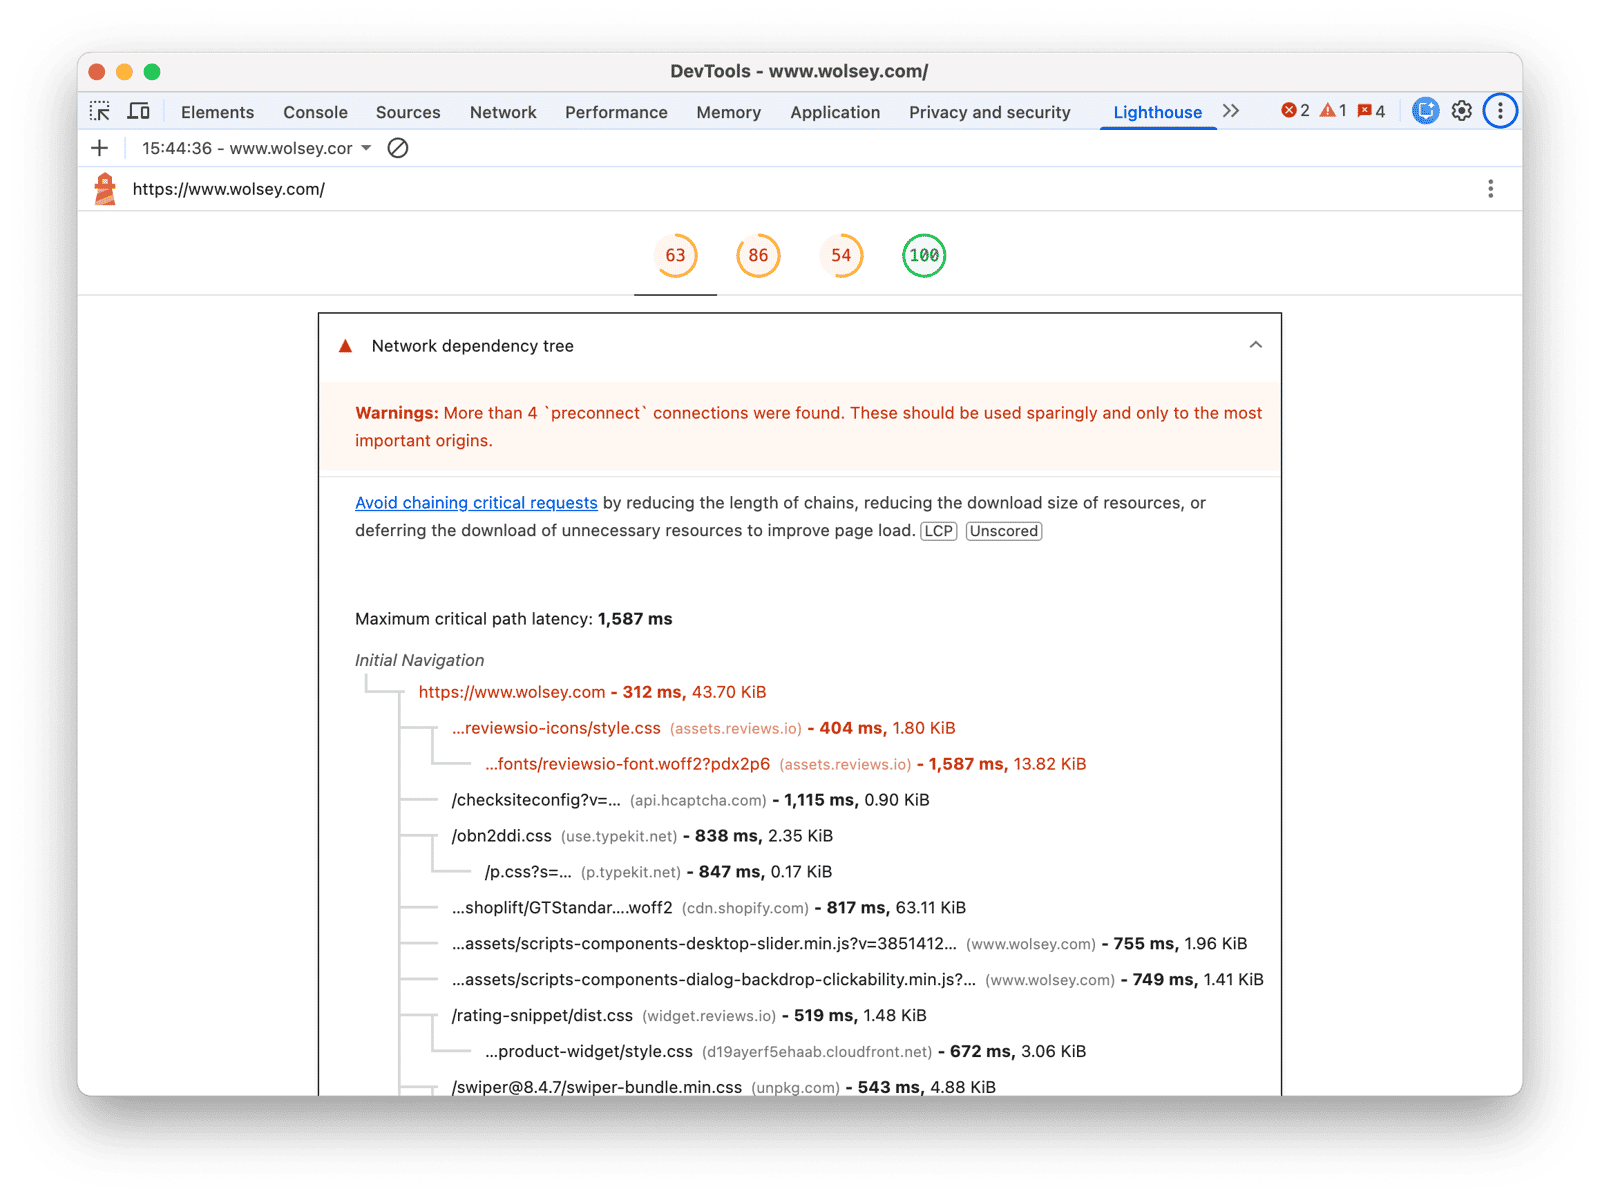
Lighthouse audit for the Network Dependency Tree
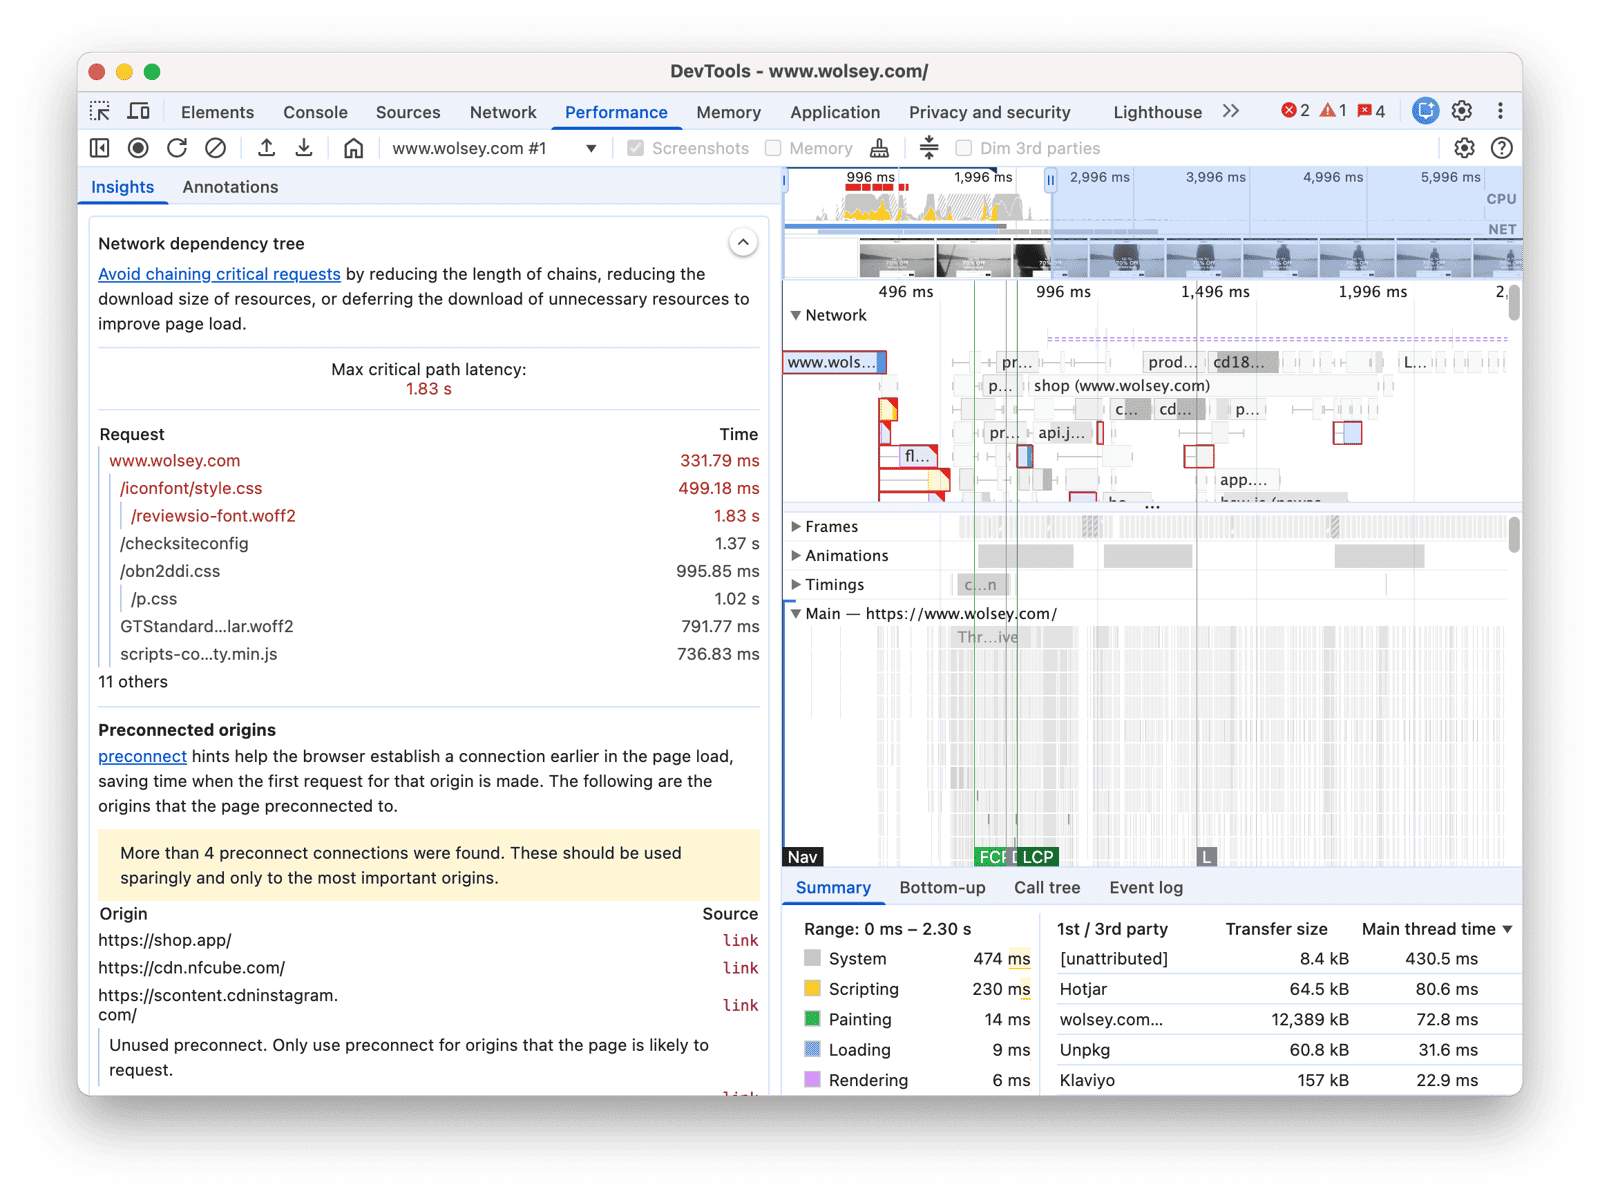
DevTools’ Performance Panel Insights showing the Network Dependency Tree
With our consent banner often being our LCP candidate, or at the very least a significant element on the page, we cannot afford to long request chains—this is why we have things like Resource Hints.
The shortest request chain is no request chain. So how might we achieve this?
1. Have the CDN perform geolocation
After their JavaScript downloads, the first action of many consent managers is to fire off a client-side API call to geolocate the user, placing an extra request on the critical path to rendering our LCP candidate.
This is nonsense.
Content Delivery Networks have been able to handle IP-based geolocation at the edge for decades[7:1].
Using Cloudflare, you can add an origin header via a simple toggle, even on free accounts. It's a little more involved with Fastly: a whopping 3 lines of VCL:
sub vcl_recv {
  set req.http.X-Country-Code = client.geo.country_code;
}
Alternatively, if you want to take a more static approach, you could set a cookie to be read by client-side JavaScript:
sub vcl_deliver {
  add resp.http.Set-Cookie = "country=" client.geo.country_code "; Path=/; Secure; Max-Age=31536000; Same-Site=Strict";
}
2. Have the CDN check consent status
If the user has already accepted/rejected consent, there should be a cookie to identify this state. Cookies are sent with every request, so the CDN can read this.
Again, with Fastly you could append a header to pass on to your origin:
sub vcl_recv {
  if (req.http.Cookie:consent-timestamp) {
    set req.http.X-Consent-Set = "true";
  }
}
Your origin can then respond with or without the banner and vary the cache appropriately, e.g.
X-Consent-Set: true
Vary: X-Consent-Set
Combined with the CDN-based geolocation means they have the knowledge to determine whether the banner needs to be shown on page load or not, which allows us to…
3. Have the CDN respond accordingly
If you’re implementing the banner as a first-party, you can literally have the CDN dynamically inject your consent banner right into the HTML response.
Want to minimise your edge logic? You can simply use a conditional to toggle open attribute on the first <dialog> element[8:1]:
export default async (request: Request, context: Context) => {
  const originalResponse = await context.next();
  const rewriter = new HTMLRewriter();

  // if we know consent is necessary, but we don't have a timestamp of when it was set, show the (first) banner dialog
  if ("false" !== context.cookies.get("consent-necessary") && !context.cookies.get("consent-timestamp")) {
    rewriter.on("#consent-banner", {
      element: (element) => element.setAttribute("open", "")
    });
  }

  return rewriter.transform(originalResponse);
};
This would effectively result in your consent banner typically rendering at the First Contentful Paint.
If you don't have control over the HTML, with the CDN's support on geolocation, you can at least minimise the JavaScript necessary [9:1]:
const consentNecessary = "false" !== (await cookieStore.get("consent-necessary"))?.value;
const hasConsent = await cookieStore.get("consent-timestamp");

// if we need consent and don't have it, show the (first) banner dialog
if ((consentNecessary && !hasConsent)) {
  requestAnimationFrame(() => {
    document.getElementById("consent-banner").show();
  });
}
Sadly, Shopify's ‘Customer Privacy’ JavaScript SDK depends on their loadFeatures JavaScript SDK, so unfortunately while you can use this to ultimately open your server-side Liquid-rendered banner <dialog>, you still have to wait for a bunch of requests to complete before window.Shopify.customerPrivacy.shouldShowBanner() can be called.
Finally, if you’re a third-party solution: you don't have control over our CDN or origin. Third parties will never be as fast as server-side rendering or even a first-party JavaScript-based approach.
And I get it: you want installation to be no more complex than adding a script tag, but at the very least you should avoid additional dependencies to render the HTML. You shouldn’t be pulling in React, Vue, Angular or jQuery – it’s your responsibility to be as lightweight as possible. The DOM nodes you introduce should be measured in the tens, not hundreds and certainly not thousands, so there’s simply no need for expensive client-side rendering libraries.
5. Withdrawing/Changing Consent
It’s incredibly rare that a visitor will withdraw or wish to change their consent, so this needn’t be any more complex than it has to be.
We shouldn't burn the >99% of visitors who'll never use this functionality with additional JavaScript weight.
- For withdrawing consent:[10:1] we simply need an endpoint that deletes the
consent-timestampcookie and redirects back to the current URL. This will re-show the banner on page load. - For changing consent:[11:1] we can follow the same approach but set a new
consent-forcecookie instead that indicates the banner should be re-shown with existing choices pre-populated.
By following this approach, we don’t need to burden every page load with our full JavaScript or DOM nodes. When we already have consent, it can be a more simple passthrough to executing the tracking.
Testing & Monitoring
As always: we can’t optimise what we aren’t measuring. So unless you’re starting a greenfield project, you should really consider how you’ll measure and monitor the CMP performance before you make changes, and either way you should definitely be testing this after the fact.
Measuring Load Time
Given our banner may or may not always be our LCP candidate, we can’t rely simply on our LCP metric to measure performance.
This is an opportunity to define your own internal metric that can be understood by technical and non-technical teams/staff alike. Maybe something like “Time to Consent Visibility” or “Consent Banner Delay”? I’ll leave that one to you.
This would be a perfect use-case for the Container Timing API (shout out to Jason William’s talk at performance.now() 2024!) because we could simply slap a containertiming attribute on the banner. Unfortunately, the only implementation is behind an experimental flag in Chrome Canary, so this might work for local testing, but it’s unlikely to be useful with third-party tooling.
Our next-best bet is the Element Timing API but this also has limitations:
-
It’s only available in Chromium browsers. Ideally, we’d like something that we can measure in every browser in case there are bugs/nuances between the platforms.
-
It only works on eligible elements such as images, videos with a poster or text-containing nodes – annoying but not the end of the world, given we can probably use a
<p>within our banner.
If we add an elementtiming attribute, then we can collect the timestamp the rendering occurs and subtract our FCP timestamp to provide a stable measure of how long after the user sees the page does the banner show up—ideally this should be zero, of course!
The tricky thing here is when using third parties: you may not have control over the HTML, so your mileage may vary. If they provide some JavaScript hooks, you may be able to use performance.mark() instead.
Measuring Interactions
It’s easy enough to measure our CMP’s INP with synthetic testing because we can isolate a synthetic test to a single interaction, but it’s a little more tricky to use INP in RUM.
My advice: set an id on your buttons/links within the banner, this will allow you to filter your RUM INP data to only interactions with those elements (both RUMvision and SpeedCurve favour this attribute, you can alternatively use data-sctrack for SpeedCurve).
You can then use the below script to read the INP in synthetic tests:
// change this to your element ID
const consentAcceptId = "consent-accept-btn"

new PerformanceObserver((list) => {
  for (const entry of list.getEntries()) {
    if (entry.interactionId && entry.target?.id === consentAcceptId) {
      const inputDelay = entry.processingStart - entry.startTime
      const processingDuration = entry.processingEnd - entry.processingStart
      const presentationDelay = entry.duration - (entry.processingEnd - entry.startTime)

      // WebPageTest exposes custom measures, using other tools may require different APIs
      performance.measure("consent-inp", {
        start: entry.startTime,
        duration: entry.duration,
        detail: {
          inputDelay,
          processingDuration,
          presentationDelay,
          targetId: entry.target.id
        }
      })
    }
  }
}).observe({ entryTypes: ["first-input", "event"], buffered: true, durationThreshold: 16 });
Synthetic Testing
Our synthetic tests should expose the marks and metrics we’ve defined above, but it’s important to consider different scenarios:
- Page load without consent
You’re probably already executing a bunch of tests like this, but you probably want to have a specific page (or collection of pages) you test in combination with #3 below in order that you can compare the impact of tracking - Long tasks when providing consent
You’ll need to script clicking “Accept All” - Page load with consent already given
Typically you can do this by predefining cookies. It will highlight if you have too many scripts executing simultaneously. Note: you may wish to use a ‘repeat view’ to measure this as most post-consent users will already have much of your site in their cache. - Optional: page load when the CMP is blocked
If you have a third-party JavaScript solution, you may wish to test the page load performance with its hostname blocked. We’re not expecting this to report worse performance, quite the opposite: this will illustrate the page load impact of the CMP tool you’re using.
Third-parties
If you’re a CMP service and intend to be a good citizen on the web, you should really add the Timing-Allow-Origin header. This ensures that the full timing information behind any resource requests can be accessed via JavaScript (and therefore be consumed by RUM providers).
Where does this leave us?
Cookie consent doesn't have to be the performance-destroying, user-antagonising experience it so often is. With a little care and the right combination of modern web APIs, you can build something that respects both your visitors' time and your legal obligations, without outsourcing the problem to a bloated third-party script.
The key takeaways are simple: utilise the web platform and your CDN/origin where possible and measure everything. Whether you adopt this approach wholesale or simply take a few ideas back to your existing implementation, your visitors will thank you for it.
You can find the full code example publicly on my Github with a live version deployed on Netlify.
Recommended Providers, if you must
If you decide to (or continue to) use a paid CMP, it might not be the worst decision if you’ve actually measured performance and continue to monitor, just don't blindly trust the sales pitch and marketing websites.
Jordy from RUMvision has a few closing recommendations who’ve prioritised performance:
People have already responded to this desire by creating browser extensions to do just that ↩︎
See dialogs.liquid ↩︎ ↩︎
See persist-consent.ts ↩︎ ↩︎
See post-consent.js ↩︎ ↩︎
See apply-geolocation.ts ↩︎ ↩︎
See remove-consent.ts ↩︎ ↩︎
See modify-consent.ts ↩︎ ↩︎